In modern electronics, there is a steadythe tendency of the installation to become more compacted. The consequence of this was the emergence of cases BGA. Soldering of these structures at home will be considered by us in the framework of this article.
general information

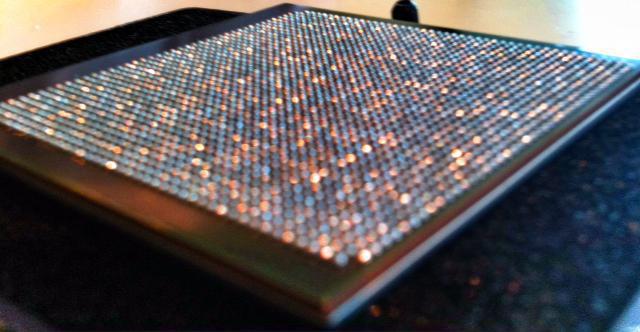
Originally posted a lot of conclusions underthe body of the chip. Due to this, they were located in a small area. This saves time and creates increasingly smaller devices. But the presence of such an approach in the manufacture turns into inconveniences during the repair of electronic equipment in the BGA package. The soldering in this case should be as accurate as possible and be precisely carried out according to the technology.
What do you need to work?
It is necessary to stock up:
- Soldering station, where there is a heat gun.
- Tweezers
- Solder paste.
- Insulating tape.
- Braid for removing solder.
- Flux (preferably pine).
- A stencil (to apply solder paste on a microcircuit) or a spatula (but it is better to stop at the first option).
Soldering BGA packages is not a difficult task.But for it to be successfully carried out, it is necessary to prepare the working area. Also, to be able to repeat the actions described in the article, you need to tell about the features. Then the chip soldering technology in the BGA package is easy (if you have an understanding of the process).
Features

Telling what the soldering technology isBGA cases, it is necessary to note the conditions for the possibility of full repetition. So, Chinese stencils were used. Their feature is that here several chips are assembled on one large piece. Due to this, when heated, the stencil begins to bend. The large size of the panel leads to the fact that when heating it takes a significant amount of heat (that is, there is a radiator effect). Because of this, more time is needed to warm up the chip (which negatively affects its performance). Also, such stencils are made using chemical etching. Therefore, the paste is applied not as easily as on the samples made by laser cutting. Well, if you will attend thermoshwa. This will prevent bending of the stencils during their heating. And finally, it should be noted that products made using laser cutting provide high accuracy (deviation does not exceed 5 microns). And thanks to this, you can simply and conveniently use the design for its intended purpose. This entry is completed, and we will study what is the technology of soldering BGA enclosures at home.
Preparation

Прежде чем начинать отпаивать микросхему, it is necessary to apply strokes along the edge of its body. This should be done in the absence of silk-screen printing, which indicates the position of the electronic component. This should be done to facilitate the subsequent putting of the chip back onto the board. The dryer should generate air with a heat of 320-350 degrees Celsius. At the same time, the air velocity should be minimal (otherwise you will have to solder the small change placed next to it). The dryer should be kept so that it is perpendicular to the board. We warm it up in this way for about a minute. Moreover, the air should not be directed to the center, but along the perimeter (edges) of the board. This is necessary in order to avoid overheating of the crystal. Particularly sensitive to this memory. Then you should pry the microcircuit by one edge and lift it over the board. It should not try to tear with all his might. After all, if the solder was not completely melted, then there is a risk to tear off the tracks. Sometimes when applying flux and heating it, the solder will begin to collect in balls. Their size will be in this case uneven. And the soldering of microcircuits in the BGA package will be unsuccessful.
Cleaning
Apply alcohol-cannabis, warm it and getcollected trash. In this case, note that such a mechanism cannot in any case be used when working with soldering. This is due to the low specific coefficient. Then you should clean the work area, and there will be a good place. Then you should examine the status of the findings and assess whether it will be possible to install them in the old place. If negative, they should be replaced. Therefore, you should clean the boards and chips from the old solder. There is also the possibility that the “penny” on the board will be torn off (when using braid). In this case, a simple soldering iron can help. Although some people use braid and hair dryer together. When making manipulations, the integrity of the solder mask should be monitored. If it is damaged, the solder will spread along the tracks. And then the BGA soldering will fail.
Knurling New Balls
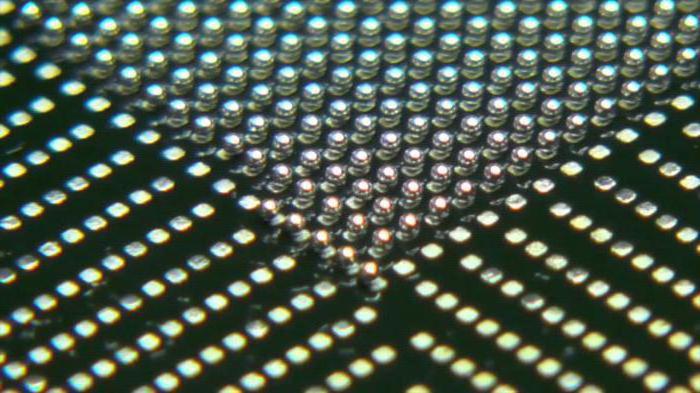
You can apply already prepared blanks.In this case, you just need to decompose them into contact pads and melt them. But this is only suitable for a small number of outputs (can you imagine a chip with 250 "legs"?). Therefore, stencil technology is used as an easier method. Thanks to her work is done faster and with the same quality. Important here is the use of high-quality solder paste. It will immediately turn into a shiny smooth ball. The poor-quality copy will break up into a large number of small round "splinters". And in this case it’s not even the fact that heating up to 400 degrees of heat and mixing with flux can help. For convenience, the microcircuit is fixed in the stencil. Then using a spatula, solder paste is applied (although you can use your finger). Then, supporting the stencil with tweezers, it is necessary to melt the paste. The temperature of the dryer should not exceed 300 degrees Celsius. In this case, the device itself should be perpendicular to the paste. The stencil should be maintained until the solder completely hardens. After that, you can remove the mounting insulating tape and a hair dryer, which will heat the air to 150 degrees Celsius, gently heat it until the flux begins to melt. After that, you can detach from the stencil chip. The final result will be smooth balls. The chip is fully ready to install it on the board. As you can see, soldering BGA-cases is not difficult at home.
Fastener

Earlier it was recommended to make strokes. If this advice was not taken into account, then positioning should be done as follows:
- Turn the chip over so that it is pinned up.
- Attach the edge to the heels so that they coincide with the balls.
- We fix where the edges of the microcircuit should be (for this you can apply small scratches with a needle).
- First fix one side, then perpendicular to it. Thus, two scratches will suffice.
- We put the microcircuit according to the notation and try to catch the coppers to the touch with the balls at the maximum height.
- Warm up the work area until solder iswill be in the molten state. If the previous points were executed exactly, then the microchip should easily fall into place. She will be helped by the strength of the surface tension, which the solder has. At the same time it is necessary to apply quite a bit of flux.
Conclusion
This is all called “soldering technologymicrocircuits in the BGA package ". It should be noted that the soldering iron is not used here to most hams, but a hairdryer. But despite this, the BGA-soldering shows a good result. Therefore, they continue to use it and do it very successfully. Although new things have always frightened many, but with practical experience this technology is becoming a familiar tool.


