/ / Knitting cymbals: for beginner needlewomen a simple master class

Knitting cymbals: for beginner needlewomen a simple master class

Warm, soft and cozy booties made byhands, necessarily warm the legs of the baby. This first shoe is used from birth, preventing the hypothermia of crumbs. It is comfortable and beautiful, and most importantly - practical.

knitting cymbals for beginners
In this article, we'll talk about knitting pinetscrochet for beginners. Our master class is uncomplicated, and therefore even the inexperienced needlewoman can cope with the manufacture of shoes. The work is done quickly and easily. Let's get started!

Knitting cymbals (for beginners): a master class

To make this lacework youIt is necessary to prepare a hook number 2.5 and a yarn of two colors - turquoise and white. We used children's threads "Pekhorka". It is desirable that the yarn consist of wool and acrylic. Crochet pinets for newborns will begin with the soles. As a rule, almost all shoes for crumbs are made, starting with the sole. So, the first three rows we will knit according to the following scheme.

crocheting pinets for newborns
First, we'll type fifteen air loops(otherwise - VP) and skip three loops. In the fourth - we will execute five columns with a crochet (CH). In the next loop we sew one CH. We repeat the operation nine more times. At the last - we will make six columns with a crochet. Now we turn our knitting and continue to work according to the scheme, that is, we make ten CHs. We end the series with a connecting post to the last VP of the lift. You should get this kind of workpiece.
crochet booties step by step

We knit the sole of baby boot for a newborn

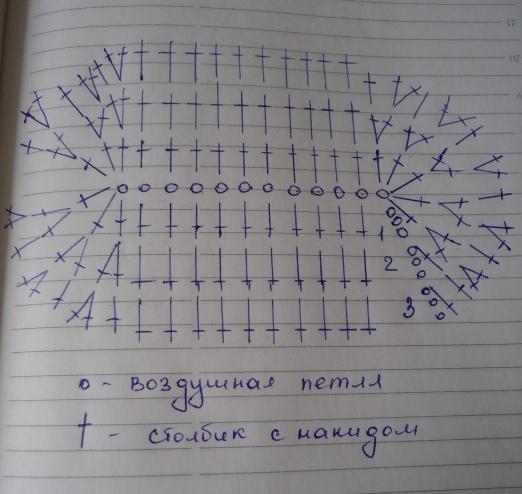
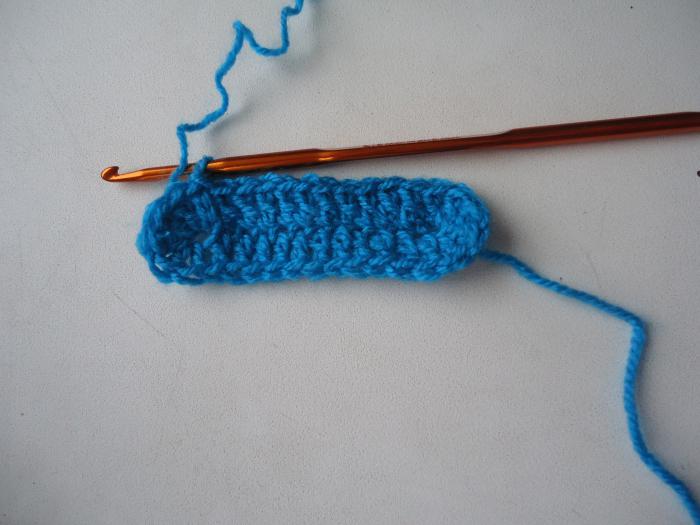
The second series will begin with three EPs, and then the firstWe will fasten the lifting loop to the column with the crochet. In the next six loops, we perform two SNs, and then ten-one each. Be extremely careful when tying all the loops. Count their number. In the next six loops, make two CHs. Turn the knitting and continue to work according to the scheme. Complete the second row with a connecting loop. Here's what you should get (see photo).

booties
Third row:after tying the three lifting loops, perform one column with the crochet in the first one, and then one - into the next loop of the base. Continue the work according to the scheme: two CH, then one CH. Repeat this item four more times. Then execute ten loops with a crochet and repeat "two CH, one CH" again six times. Spray another ten columns with a crochet. Everything, the third row is ready. To complete it, take the thread of white color and make a connecting bar. That's what you should get.

Knitting cymbals for beginners: we perform the "sides" of products

The fourth row is made of white yarn,without a crochet, while the hook should be inserted behind the back of the loop. We finish the series as usual with a connecting loop. We will repeat the scheme, having executed still a circle of columns without a crochet. After tying the fifth row, we end it with a connecting loop with a blue thread. Now we start knitting "shishechek." We begin the sixth series with two EPs. We use an element of two unfinished HVs and make one air loop. Having passed one EP of the base, we will issue a "bump" consisting of three SNs (unfinished). We will make the whole series of such knobs, perform between them one VP. Complete the series with a connecting column, inserting a hook into the top of the element. The seventh row is performed by analogy with the sixth, we close it with a connecting loop and we cut the thread.

booties

The final stage of the work: we knit the "toe" of shoes

We take a white thread and perform the initialloop. We mark the middle of the booties, we insert the hook into the loop (behind the back wall of the "bump"). Pull out the initial loop. Further crocheting crocheted booties looks like this: we tie a "knob" consisting of two EAs and the same number of CH (unfinished). In the next loop, perform an element of three unfinished CH. Such "shishechek" in total it is necessary to make fourteen. After that we tie two EPs, turn the product over and continue to perform "shishechki", the first should be made of two unfinished HF, and the next - out of three. Do not forget to execute one VI between these elements.

booties
In general, seven elements should be done.Next, make the connecting column, fixing the tops of cones on both sides. The toe is almost ready. Now we make a "knob" of two unfinished HFs and the same number of EPs, and then another of the three HAs, inserting the hook into the "leg" of the last column of the element. Again, perform one EP and a "little knob", inserting the hook the same way as before. After tying a row of "knobs" to the top. We finish the seventh row by analogy with the knitting pattern of its beginning. In exactly the same way, we perform two more series. We close the last connecting loop using blue threads. That's all, we almost completed our knitting cymbals. For beginner needlewomen, we hope our master class did not seem too complicated. Now it remains only to make an obzhurnoy obvjazku. It is fulfilled elementary: according to the scheme one CH + three VI. The bars are sewn into each subsequent loop of the previous row. Well, that's it, that's the beauty we got! By analogy with the first we make the second boot. Success in creative work!

Liked:
0
Popular Posts
Spiritual development
Food
yup