It would seem, how much time has passed sincethe moment when there were various giant giants, extinct and gone far into the past. In fact, various dragons and dinosaurs occupy a separate role in the modern world: they are not only frequent guests of various horror films, but also favorite heroes of the younger generation of boys and girls. Of course, what could be better than an unknown flying creature, which is definitely not afraid of any obstacles?
Exhaling Flame

Little fans of big dragons, no doubt,dream of a home version that could be put on a shelf and even show to friends. Then we will tell you how to blind a dragon with your own hands, without spending much effort. What you need to say before the creative process is irreversible: there are several materials that you can use. Firstly, it is plasticine - raw materials, with which they work even in kindergarten, focusing only on its inedibility.
It's very easy to create with him.And if we talk about the process itself, then this is one complete pleasure, especially if it is a question of children and their motor skills. Plasticine suffices for the temperature of the hands that it receives during work, and it is very easy to create various small figures with it. But a plasticine dragon will not serve you long. In fact, a slight increase in temperature affects its resistance and strength.
Molding of polymer clay for beginners

If we are talking about polymer clay, then with ithave a little trick. The fact is that this material is more capricious and demanding in the process of molding and after it. But with certainty it can be said that a clay dragon will definitely serve you for a long time, if it is properly processed. This material is usually divided into two categories: self-hardening, which you just need to leave for a whole day in the fresh air, and baked in the oven.
Usually the last process takes no more thanhalf an hour and much faster than the first option, but it requires preliminary preparation. In addition, when it comes to brightness and color palette, the polymer clay is in no way inferior to plasticine: modern product markets represent a huge number of color and white varieties, which can later be painted and varnished.
Aids
To mold the dragon brought only positiveimpressions and emotions, it is necessary to prepare all the materials in advance. In our case, this process will not do without additional purchases, but the main part can still be found in every house:
- Stacks.These small sticks are indispensable when working with plasticine, as they provide thoroughness of the workpiece. They can be bought in a store, where their choice is simply huge, but you can find houses without spending a single extra ruble. For example, an excellent ball-point pen, which has served on the written front, perfectly copes with eye holes and small dents. To create a texture, you can use an old toothbrush or iron sponge. Thin lines are beautifully created with a toothpick or sharp pencil.
- Plasticine or polymer clay.The choice of these materials is truly huge and does not end on sets with dim colors of sadness and longing. These sellers provide a huge selection of products for buyers of different levels of skill and thickness of the wallet. So, the question of how to blind a dragon, or rather, from what, you can find the answer only in yourself.
- The final coverage.In order for the image of our hero to look bright and juicy, we will need to use a coating that gives expression to the toy. With this role, the normal base nail varnish without sparkles and mother-of-pearl perfectly handles. He will make the colors brighter, and will give durability to your product. But it is important to clarify that the dragon from plasticine does not need such an addition.
Preparation for the modeling process

Few people know how to make a dragon from one or another material. In order to start making this creature, you need to perform some actions in advance, which will now be carefully considered:
- We clean the work surface from extraneous things that may interfere with further work.
- Put all the necessary stacks, sticks and scissors on the table, after having processed them with cleaning agents.
- For beginners, the molding of polymer clay ispuzzling process. Therefore, beginners should stock up a pair of medical gloves. This step will protect your product from the appearance of greasy stains and unwanted fingerprints.
Modeling
It's time to start the process of creating a dragon fromclay The description for different materials will be one, but throughout all the time additional comments will be added relating to a particular product. For more convenience, all actions will be described step by step:
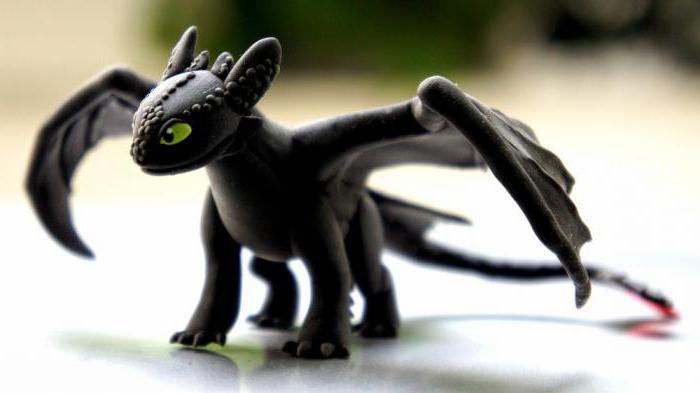
- For starters, you should blind the body for ourthe dragon. It is identical to a trapezoid with rounded edges. Next, insert the toothpick into the finished part, fixing it tightly. In the future, it will help us attach the subsequent parts without damaging them.

- We make the legs and arms of our character,diligently marking on them the nails and folds. These parts are shaped like drops and easily attached to the body without much effort. In addition, to add detail, we make nails of white clay or clay and fix them in the previously planned cavities.
- It's time to dazzle the creature's head:for this, we form a ball having some similarity with a rugby ball. With the help of self-made or purchased stacks, we make eye sockets, carefully pressing in the right places. Yellow color is perfect for the eyes, making them many times more expressive, and black serves as a pupil. We place the eyes in the target cavities and fix them there with a slight pressure. Making the slit nostrils. As an addition, you can add different spines and thorns. The head is placed on the body, gently putting it on a toothpick.
- We create wings and tail, giving them the desired shape, then fix it on the body.
- At this stage, the figure of clay canconsidered ready, and clay modeling for beginners is still ongoing: bake the dragon in the oven at a certain temperature or leave it to harden on its own.
- After complete curing, cover the face with a final coat of nail polish.
Although the shelf
Now we know how to make a dragon and holdtime with pleasure. And the result of all the works is an odd job that can be a wonderful toy, a statuette or just a gift for loved ones.


