


Most modern userscomputer systems are aware of what a virtual disk is. The advantages of using this emulator are undeniable, they are written about a lot. In our material, we suggest to consider several methods that allow creating disks of different types that can be used for completely different purposes.
It's worth starting with the fact that some userserroneously believe that these disks are exclusively in logical partitions, which are created on the hard drive after the hard disk is broken. And many completely forget that the CD / DVD-ROM drive emulator can also be called a virtual disk, which is a software analogue of the "iron" colleague.
We will consider creating logical partitions, and creating virtual drives.
As for the sections, the advantages of theiryou can store important information on them, which, even if you reinstall the system, will not be deleted, since the formatting concerns only the system disk, and the logical partitions are not affected. In the case of virtual drives, the user gets a fairly interesting tool for working with image files. If they are "inserted" into such a drive, they will not differ in any way from the most usual optical media.
It is not necessary to create logical partitionsuse some specialized programs. To do this, Windows provides its own tool (disk management). You can access it through PCM on the computer icon with the subsequent choice of control (administration), but it is easier to use the "Run" menu and the diskmgmt.msc command.
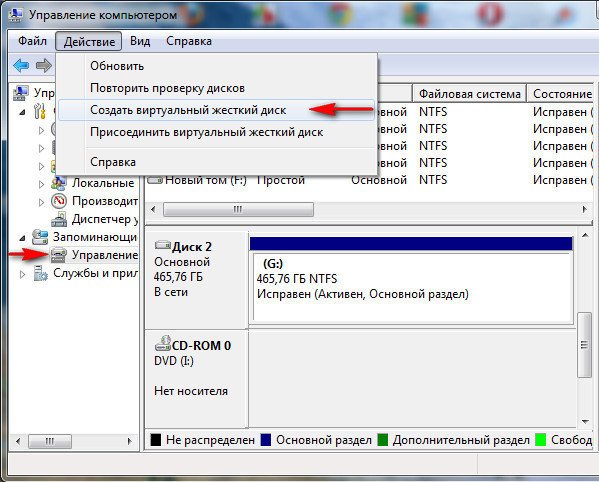
Virtual disks in Windows are created through the menuactions on the main panel where the corresponding task is selected, after which a special "Master" will be launched. In the parameters of the new partition you will need to specify the location of the section file, the required size (at least 3 MB) and the preferred format (fixed or dynamically expandable).

It is better to choose a fixed size, becausewhen overflowed, the dynamic virtual disk will increase in volume due to the use of the system partition space. And this can lead to the fact that the free space in the system partition will become so small that Windows can not work properly (it is considered that there should be at least 10% of the total volume of the partition for the normal operation of the system on the "C" disk) . After the completion of all the actions in the "Wizard", the disk will appear in the list of devices.
So, the virtual disk is visible, but you can not do anything with it, even though the virtual adapter driver is installed automatically.
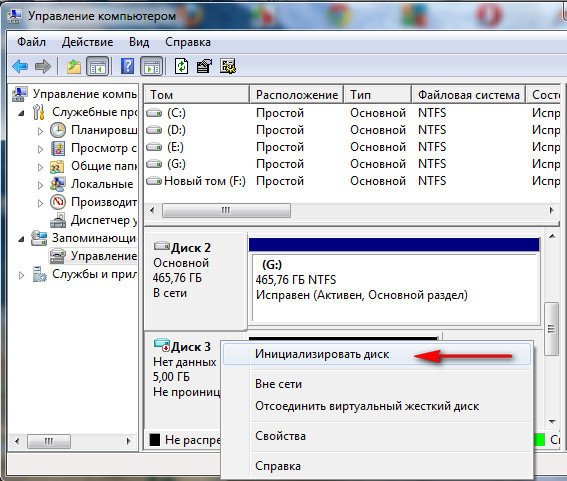
The next step is to initialize the createddisk. To do this, use the corresponding item in the RMC menu on the selected partition, after which you need to specify the partition style (MBR or GPT). Usually MBR is selected. But if the partition size exceeds 2 TB, you need to use GPT.
Finally, the creation of a simplevolume, the partition is assigned a letter and its formatting is performed. At the end of all procedures you will get a section with which you can work just like with a regular hard drive.
Note: for simplicity, you can use the program AOMEI Partition Assistant, in which the creation of a new section looks more convenient and practical.
Programs for working with images are used to create a virtual drive.

In UltraISO, the whole procedure is tomenu options on the main panel select the settings item and go to the tab of creating a virtual drive and just specify the desired number of drives (instead of "No" in the image, select the number from the list) and the location of the virtual device file. After saving, they will appear in the "Explorer" and will work as their "iron" counterparts.
Windows 10 advantageously differs in that in thisit is not necessary to create virtual drives. It's enough just to double click on the image file, after which the drive will be mounted automatically (and even with the volume label). To complete the work with the drive via the PCM, the extraction command corresponding to pressing the eject button on the "iron" device is selected.


