


Most modern userscomputers, regardless of installed operating systems, are accustomed to the fact that the hard disk is divided into system and logical partitions. But sometimes, for example, when buying a new hard drive or SSD solid state drive, the situation changes. It is required to divide the disk into sections, since initially the manufacturer does not perform such procedures. The same applies to situations where an unnecessarily large amount of space is allocated for the system partition, and it is desirable to use it more efficiently. To perform such actions, you can offer a few simple solutions based on the use of both standard Windows tools and third-party software.
A little distracted from the main topic, let'sFirst, we will review what we may need to partition the hard disk for. The advantages of such actions can be considered quite a lot. Most importantly, after the breakdown, the user receives a virtual partition, where saving important information will be more secure. What is it expressed in? Only in the fact that even with the "rally" of Windows, when nothing but reinstallation does not help, the re-installation will be performed in the system, not the logical partition. Even when formatting the “C” drive, the data stored in the virtual partition will not be affected (unless the system is installed in the virtual partition).
Еще один плюс для профессионалов – возможность installation of the second operating system, which differs from the main one in the modification, namely into a free logical partition without using any kind of virtual machines.
We now turn to practice and see how to partition the disk at the stage of installing the operating system.
At a certain stage, the installer will issue a request forabout the partition in which you want to install Windows, if you choose the option of a selective installation. On the new hard drive, you must first delete the existing partition by clicking on the appropriate button so that unallocated space appears in the list.
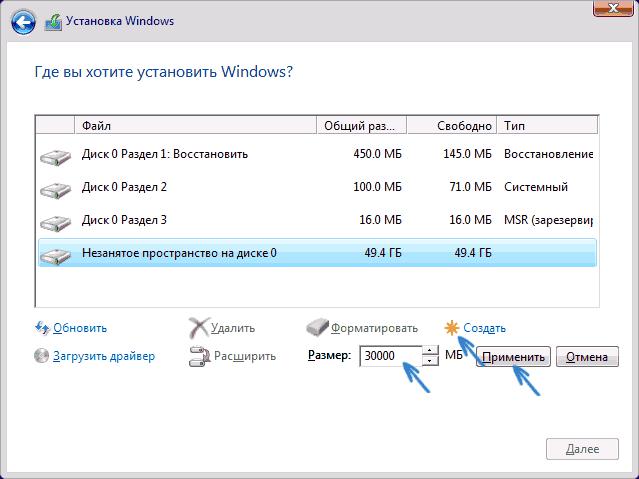
After that it can be broken into two.partition (system and virtual) by pressing the button for creating a partition and specifying the required volume for the system disk. The second section is also created in the same way, but the size can be omitted manually, since it will correspond to the remainder of the unallocated space. You can enter a size value if you intend to create more than one logical partition.
Note: for all sections it is recommended to format immediately (you can even fast), because after installation in the "Explorer" they can not decide.
Now a few words about similar operations inalready installed system. Before the advent of the seventh version of Windows, for splitting it was necessary to use only third-party programs, but, starting with Windows 7, the own regular tool in the form of a disk management utility was integrated into the system. With its help, Windows allows you to split a disk within a few minutes, although the use of this toolkit looks a bit more abstruse than the similar features of third-party programs. We’ll stop on them a bit later, but for now let's consider the standard process.
First you need to call the control section itself,using the administration or “Run” console with the diskmgmt.msc command. It must have administrator rights. If there is no launch point on behalf of the admin in the execution menu, you can use the Task Manager, create a new task and enter a similar command in the field that exactly corresponds to the Run console, marking the administrator’s task execution point.
How to break a disk in this editor? Very simple! Suppose that we only have a drive "C".

First, through the PCM, the volume compression point is selected.The system will offer to free up all available space. This is not recommended. Leave the system at least 10-15 GB as a free reserve for the needs (in general, it is recommended to keep an unused volume on the order of 10% of the total size of the system partition).

After compression, an unallocated area will appear,for which, through the right-click menu, the item for creating a simple volume is selected, and then the “Wizard” starts, which will ask you for the size of the partition. If you create only one virtual disk, the value can not be changed. After that, you will need to assign a letter to the section (for example, D) and agree with the formatting proposal. Upon completion of all actions, a new partition will appear in the file manager even without rebooting.
Now a few words on how to producepartitioning a disk using the universal diskpart tool that works exclusively in the command console and is not invoked in any other way. For this you need to run a few simple commands.
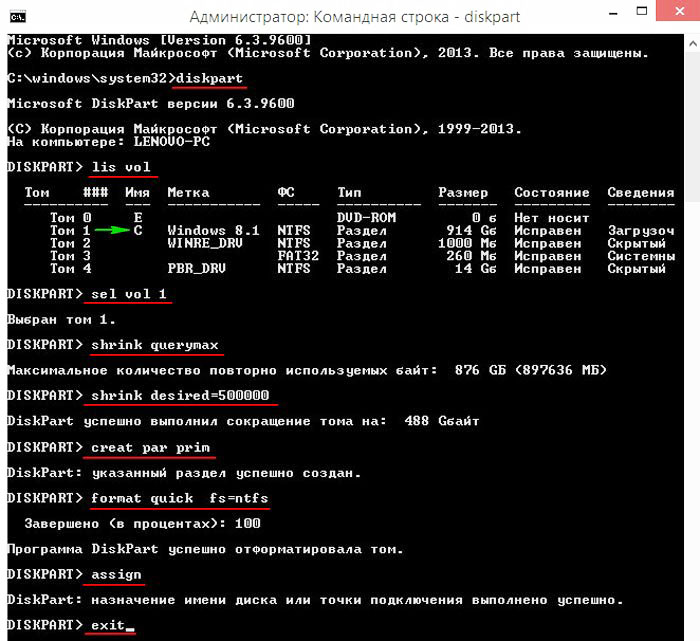
The treatment of each team in the aboveThe algorithm does not need an ordinary user in general. Attention should be paid only to the initial selection of the partition being partitioned and the indication of the size of the volume being created. The assignment of a disc letter, if it is not specified, will be made automatically.
Finally, we turn to specialized programs.and see how to split the disk with the help of the assistant from AOMEI. It can be immediately noted that the program looks very much like the Windows disk management section, but the actions performed in it are simpler and more understandable to the average user.

In the application, just select the one to be broken.partition and in the left menu use the partition partitioning item, then set the required parameters for both disks by moving the special slider. Then, to confirm the installed options, the OK button is pressed, and to start the process, the “Apply” button is located on the top.
Note:partition partitioning will not happen immediately, but after restarting the computer system, and may take quite a long time, depending on the initial volume. The process itself will be started before the start of Windows.
This program in terms of actions performedresembles a past utility. Only in it, first select the Move / Resize item, and then with the help of the fader set the required parameters relating to the created sections. After that, the Create Partition item is used, and then the creation of a simple volume (in this section, you can not change anything, just enter the label of the new disk). After clicking Apply, the main process starts from the top.
Finally, let's see how to split a disk withthis tool. Actually, almost the entire algorithm is exactly the same as that of the program just described, except for the need to create a simple volume.

Even a beginner can handle this utility. The main thing - do not overdo it with a decrease in the size of the system partition.
Вот вкратце и все, что касается методик разбиения disk into several components in the form of logical partitions. There is nothing particularly difficult here, but in terms of use, of course, the three programs described look much simpler than Windows’s own tools, so all those who do not understand the intricacies of such processes should prefer these software packages.


