Origami is a very interesting art form.We suggest you get acquainted with it a little closer and learn how to make such an interesting hand-craft as the Easter egg from the modules (master class, the assembly diagram of the parts is attached).
What is origami?
Origami is the art of folding paper into various shapes. The word is formed from two Japanese words, which in literal translation means "fold" and "paper".

In Japan, this form of art arose many centuries ago and found its fans around the world.
The most popular creation is the crane.The Japanese even have their own legend on this score. They say that the person who folds a thousand cranes of paper for his life will be happy and rich.
In the technique of origami, you can do many different things: toys, crafts, jewelry and useful things for the house, gifts and so on.
Types of origami
There are such types of origami technique:
- Simple. It is limited to such manipulations with paper as accordions and folds. Suitable for beginners.
- Folding according to the scan. A more complex view of origami. The principle of the technique is as follows: the paper is marked with folds, and then gently assembles into the figure.
- Wet or wet folding.The technique used to fold flowers and animals. Its principle is this: the paper is slightly wetted with water, after which the figure is collected. As a result, more smooth lines of folds are obtained, which are very close to natural forms.
- Modular origami.This technique involves the use of several sheets of paper, different not only in color, but also in size. As a result, you should get a figure consisting of several parts.
Origami of the modules: Easter egg
More often in such technique as modular origami are created various objects having the spherical form. Therefore, it is better to do the Easter egg in this way.
You can do this in two ways:
- First: it requires several colors of paper, which alternate sequentially. The result is a striped egg.
- Second: the Easter egg will turn out with a beautiful ornament.
You can also make a stand for an egg from the modules. Such decoration can be placed in the center of the festive table.
Creating modules

Universal master class on creating modules for origami crafts:
- Take a rectangular piece of paper and fold it in half (Figure 1).
- Fold the sheet in half again to create a fold line perpendicular to the previous one and unfold it (illustration 2).
- Turn the left and right corners to the center line. You have a triangle with one protruding side (Figure 3).
- Bend the right edge of the left side slightly so that it can not be seen.
- Similarly, make the right side (illustration 4).
- Turn the figure upside down (figure 5).
- Fold the protruding parts (Figures 6 and 7).
- Turn over the shape (Figure 8).
- Bend the peeping corners downwards (Figure 9).
- Turn the shape over again (Figure 10).
- Expand the edges by bending the corners for this (illustration 11).
- Hide the corners below, bending the edges up for this (figure 12).
- Fold the figure in half (Figure 13). The first module is ready for you (Figure 14).
Methods of attachment of modules

Each module can be connected in several ways:
- The first way (Figure 1). Two modules are inserted in the middle of the third with their wings on the long side.
- The second way (Figure 2). Two modules are inserted in the middle of the third with their wings on the short side.
- The third way (Figure 3). Two modules are inserted by the long side with their wings in the middle of the third on the short side.
The first version of the crafts

A master class on how to make an Easter egg from the modules:
- Collect many modules from paper of three colors (for example, white, green and blue).
- Prepare ten pieces of blue for the first and second rows of crafts.
- Connect them together in a second way, that is, on short sides.
- Close the row in a circle.
- Now you need to increase the number of parts in half. To do this, put one blue pouch on each corner of the last level modules with one blue part.
- Twenty blue modules are worn in the fourth row.
- The fifth row also consists of twenty modules, but already white.
- The sixth row is twenty green modules.
- The seventh row is twenty white.
- The eighth and ninth row are twenty-two blue modules.
- The tenth row will already consist of only ten modules. For this, wear the parts through two corners.
- The eleventh row is ten blue modules, which are put on four corners of the details of the previous rows.
- The last row is done in the same way as the previous one. Thus, the easter egg executed in the technique of origami from the modules closes.
The handicraft is ready!
The second way

A master class on how to make an Easter egg from modules with a pattern:
- Assemble a row of ten blue modules in a second way and build them in a circle.
- Put on the second row of blue modules of ten parts.
- In the third row, the number of modules is doubled. To do this, the parts are inserted between the elements of the second row.
- The fourth row - twenty blue modules connect the details of the second and third rows.
- The fifth row is an alternation of ten blue modules and the same number of violet ones.
- The sixth row consists of forty blue modules inserted between the parts of the previous row.
- The seventh row is forty modules of violet and blue colors that connect the elements of the previous level.
- Until the nineteenth row, the modules are threaded in forty pieces. Do not forget that you need to follow a certain color sequence to get out the pattern.
- On the fifteenth row, reduce the number of modules to twenty. The procedure is the same as in the previous master class.
- On the twentieth row begin to form sharp tips in a zigzag shape.
- If the tip of the egg diverges, then it can be cemented with PVA glue.
We collect the stand

Master class of how to make an Easter egg on a stand of modules (photo attached):
- Twenty-four violet modules are assembled together and connected in a ring.
- The second and third rows consist of orange and blue modules of twenty-four each.
- In the fourth row, the number of modules decreases.To do this, the module is inserted in red, after which two violet details capture three corners. The red element is inserted again and the process repeats to the end of the row. As a result, you get eighteen modules.
- The fifth row - two red modules are inserted.
- Sixth - the number of modules decreases to twelve.
- The seventh, eighth and ninth rows - twelve modules of different colors.
- Tenth - the number of modules increases in two rows.
- Eleventh - additional green modules are inserted.
- Twelfth - two purple modules are inserted.
- The thirteenth row - insert the orange modules between the purple, and the amount of green is reduced.
- Fourteenth - put in two orange modules.
- Fifteenth - add red modules that are inserted between the orange ones.
- Sixteenth - additionally insert another red module.
- On the seventeenth row, branches are formed. To do this, pass the modules between the orange ones.
- Eighteenth - one orange module is removed.
- Nineteenth - leave two red modules.
- The twentieth row - the orange module is attached and continue to form branches.
- The ends of the branch are decorated with two orange modules.
- Similarly, all branches are made.
Stand ready! In her middle there is an egg.
Another way to make a stand
Master class on how to make a simple stand for the Easter egg from the modules (the assembly diagram is described):
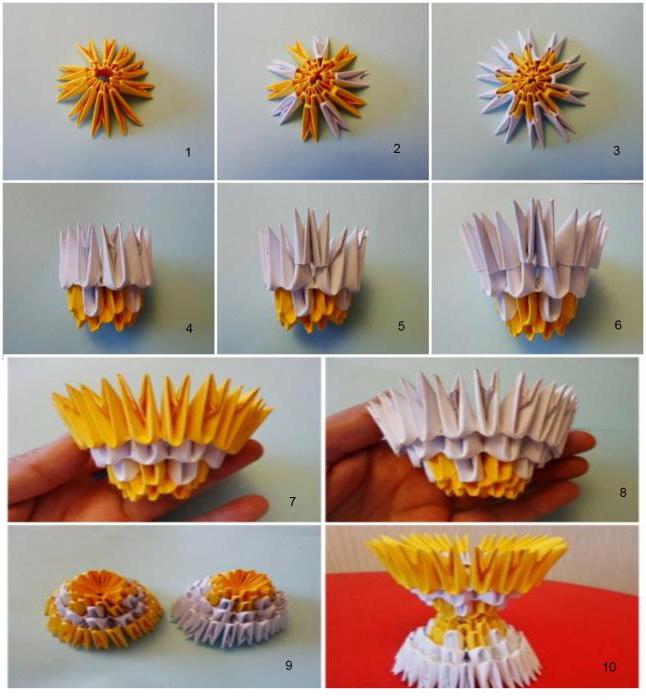
- We collect a circle of yellow modules (Figure 1).
- We put on the same number of modules, alternating yellow and white colors (Figure 2).
- The third row consists of all white modules (Figure 3).
- The figure should be collected and slightly compressed (Figures 4 - 6).
- The fourth row consists of yellow modules (Figure 7). The first half of the stand is ready.
- Assemble the second part of the stand in the same way, only alternating the colors differently (Figure 8).
- Connect the two halves of the stand to each other (illustration 9 and 10).
A simple stand for the Easter egg is ready!Tip: if you want the egg not to drop out of the stand, then glue it with PVA glue or double-sided adhesive tape. And if you want the craft for a long time you served, then make it from a thick paper of bright colors.


