


ISP Rostelecom refers tothe oldest telephone operators and providers in the territory of the Russian Federation. The list of services provided by them is quite large. This is not only the implementation of an Internet connection, but also interactive television, telephony. In addition, this operator produces its own equipment. That is why there is nothing surprising in the fact that many users are interested in how to set up Rostelecom equipment.
It is clear that the company itself has nofactories that would be engaged in the release of routers. In fact, everything is done simply: a lot of equipment is purchased from Chinese manufacturers - such as Huawei, D-Link, ZTE, etc. - and the company logo is pasted. This is a common practice that is conducted throughout the world.
Currently the most common models of routers are:
Sagemcom f @ st 2804;
Sagemcom f @ st 3804;
D-Link DIR-300;
D-Link DVG-5402SP;
QTech RT-A1W4L1USBn;
ADSL router Startnet AR800;
D-Link DSL-2640U T3;
Sagemcom f @ st 1744 WiFi router.
As can be seen, there is a large varietymodels. And because the settings "Rostelecom" equipment can cause difficulties for a beginner. But they are in many ways similar, so by understanding how one model of a router or modem is configured, you can learn how to work with other types of equipment.
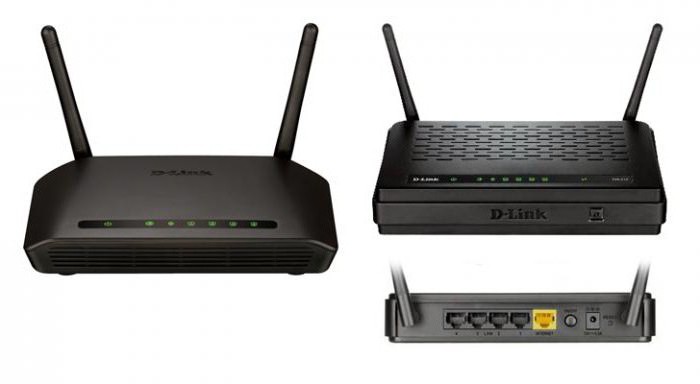
D-Link equipment is very loved by operators onRussian market. Rostelecom was no exception. Configuring D-Link (routers) usually runs quite smoothly and does not require any highly specialized knowledge from the user.
After connecting the router will need to runany browser and in the address bar type: 192.168.0.1. The router settings window will open. Here, as a password and login, you will need to enter a bunch: admin and admin.
A beginner can fully use the “Setup Wizard”, which in the semi-automatic mode will provide all the necessary settings of “Rostelecom” and other operators.
The settings menu is invoked in the same way as it was indicated above, through any Internet browser. Next, you need to click on the Click’n’Connect tab and connect the cable from the provider.
After clicking on the "Next" button, you will need to specify the type of connection used. If there is any doubt what type to specify, you need to clarify this information with the provider.
In the next step, you should name the connection and come up with your password and login to login. If the password and login was issued by Rostelecom itself, then you don’t need to invent anything, you should enter them.
It is possible that they will additionally be asked to enter a VPN,DNS and other data, which also gives when entering into a contract by Rostelecom. The connection of the test node will begin immediately after clicking on the "Apply" screen button.
After wired internet successfullyconnected, you can begin to configure Wi-Fi. Everything is quite simple here. You only need to come up with a name for the connection (SSID text field) and your own password (in the "Encryption Key" PSK) so that no one can get connected to the network from the outside.

At this, the WiFi setting of “Rostelecom” will be completed on this router.
Rostelecom provides services on digital television. What matters here is also the method used to connect, IPTV or VLAN.
In the first case, all you need is to specifyIPTV port. In the second you will need to tinker a bit. The situation is aggravated by the fact that the D-Link settings interface is built in such a way that after the connection to the Internet as a whole is configured, the Rostelecom IPTV setting is no longer possible. Therefore, it should start with the adjustment of television. If the telepack has not been purchased, then you can simply skip this type of setup.
So, if Internet TV works throughVLAN, then you need to select the "Advanced" area in the main menu, then click on the VLAN link. You will be prompted to specify a specific port that is used by the set-top box. In most cases, this is Port-4. You need to click on the item “Delete port” and then click on “Save changes”.

There are two options:
IPTV comes untagged.In this case, you will need to select the WAN option, then in the “Port” section specify Port-4, and in the tag field set the value untagged. This achieves the result that the provider cable is connected directly to the set-top box, and not to the router.
While in the main settings menu, you need to select the “Network” section, then follow the WAN link and click the “Connect” button. The advanced PPPoE settings will open.
Accordingly, in the “Connection Type” field, set the PPPoE parameter, specify the fifth WAN port. The login and password are entered by those issued by Rostelecom itself. Done, you can enter the Internet.
As you can see, the settings of Rostelecom when connecting via PPPoE are also quite simple, they can even be performed by a novice user.
In some branches of "Rostelecom" issuedDSL routers and modems. You can consider the connection rules and settings on the example of the model D-LINK DSL-2640U. For many other models, the procedure will be the same; there may only be a slight difference in the external interface of the settings window.
First you need to attach itselfdevice to the Internet cable provider. Then open any web browser and enter in the address bar: 192.168.1.1. Then in the dialog box, in the login and password fields, type admin and admin again.
The main settings window will open.Here you need to select the “Network” section and the “Connection” subsection, add a new connection and select PPPoE as the type. Filling in the VPI and PCI values, it is necessary to clarify in advance exactly which parameters should be specified for this region.
PP-username and password are filled in according to the data issued by Rostelecom.
Keep Alive must be turned on.The values of the LCP interval and LCP dip can be set to your discretion. The last parameter indicates how many requests the modem will send to the provider for the connection in a row, and the first one - what is the time of repeated sending of the request in seconds.
You also need to tick the IGMP and NAT options.
It remains only to save the changes and select the item “Save and reload”. Setup DSL Rostelecom completed successfully.
Once Zyxel modems were quitecommon in the post-Soviet space, and even received the affectionate name "Zuhel" from users. Today, models are much more, but no one is going to write off the “good old” Zyxel from the accounts.
Traditionally, setting should start withthat when the device is turned on, the browser opens, and in its address bar it is typed: http://192.168.1.1. You will be prompted to enter a username and password. Depending on the firmware version and the specific Zuhel model, the parameters can be used: admin / admin or admin / 1234.
Далее нужно будет перейти в раздел «Интернет» и in the "List" tab. Here you go to the link Broadband connection. As a WAN port, you can choose any of the proposed. You also need to ensure that the checkboxes are checked next to "Enable interface" and "Use for Internet access." But from the item "Get an address by DHCP" checkbox will need to be removed.
In the IP settings, you should specify "Do not use the IP address" and in the "MAC address" point, select "By default".
Next, you will need to click on the "Add connection" button in the "Authorization" section. Here you will also need to make some adjustments:
connection type - PPPoE;
think up your connection name;
connect via Broadband connection ISP;
login and password are entered those that were issued by Rostelecom.
It remains only to connect to the Internet.

As can be seen, the setting of Rostelecom is not as complicated for Zyxel Keenetic as it probably seems at first glance.
Another option is setting Zyxel Keenetic.
Depending on the model of the "Zuhel" andfirmware, which is used in it, the setting may look different. For example, for Zyxel Keenetic DSL this will occur through the NetFriend quick setup wizard.
First you need to reset all previoussettings. To do this, when the modem is running, type in the address bar of the browser: http://192.168.1.1/RU/nf.html or: http://my.keenetic.net/RU/nf.html.
Next, you will need to click on the "Quick Setup" button. As a login and password, enter the appropriate values issued by Rostelecom.
In the next step, the “Wizard” will ask you to specify the VPI and VCI. They need to be clarified with Rostelecom regarding a specific region. The same applies to encapsulation options.
If Rostelecom did not provide an individualIP addresses will need to be marked “Automatic” in the next step. Otherwise, enter the IP issued by Rostelecom. You will also need to enter the gateway mask settings, the gateway IP address and DNS address. This data should also be issued by Rostelecom.
Then the button “Connection Test” is pressed.
Probably the easiest thing to do with the settingsin the event that the Rostelecom modem is 3G or 4G. All that is required in this case is to simply insert the modem into the USB connector of the computer and wait until the “Software Installation Wizard” starts. As a rule, nothing special needs to be done, only occasionally agree with all the conditions and click on the "Next" screen button.

All the necessary settings and parameters are already sewn directly into the Rostelecom modem.
Even easier if Rostelecomprovides access to the Internet through a television cable. All that is required in this case is simply to plug it into the corresponding socket in the equipment. Such devices already have everything you need for a successful connection.
You can make all the necessary settings forInternet connections through Rostelecom and standard Windows tools. For different versions of the operating system, this may look different, the differences will affect only the choice of buttons and links, the principle of operation will remain.
For example, as for Windows 7 and older,Rostelecom settings are automatically issued for each computer. This also applies to the IP address and other parameters. The user only has to plug the Ethernet cable into the slot on the PC network card.

If for some reason it appearsIf you need to inquire about the settings or enter them manually, then you need to select “Internet and Network Connection” in the Control Panel, right-click on the connection icon, select the “Properties” item from the context menu that appears. Then you will need to mark “IP version 4 properties” in the new window and click on the “Properties” button. The values that appeared in a separate window can be recorded on a separate sheet or in a text file so that, if necessary, you can enter them yourself.


